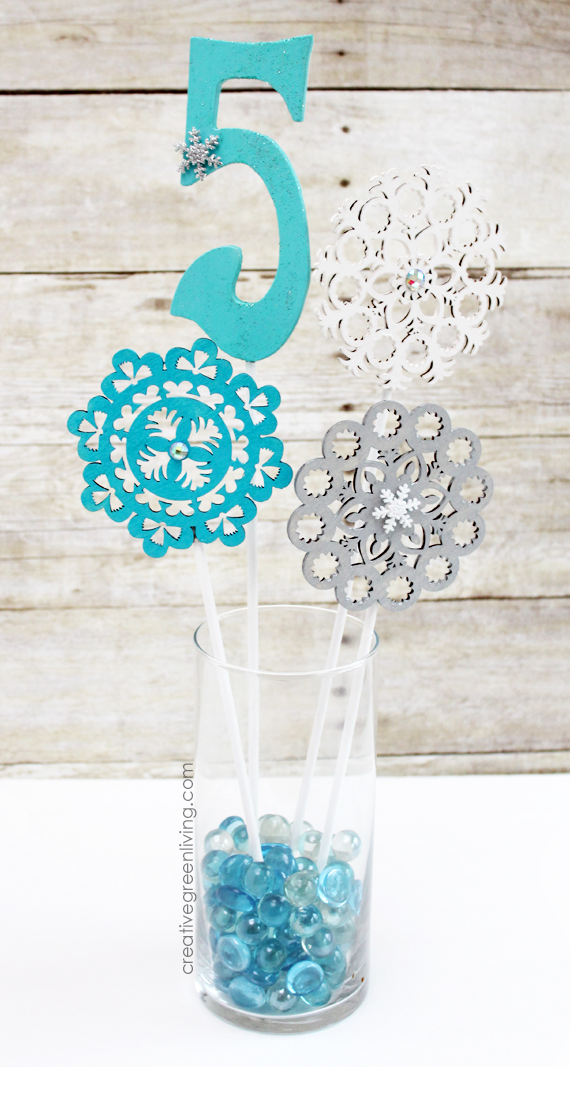
When my best friend's daughter turned five, she decided to have a Disney Frozen themed party. I made these easy DIY centerpieces featuring snowflakes and sparkles - everything Elsa loves! This pretty Frozen center piece idea also doubles as a party favor since guests can take them home to use as magic wands! Just let each guest choose a snowflake wand to bring home and practice their freezing powers.
If the birthday kid has a Frozen inspired bedroom, use hot glue instead of wood glue to attach the snowflakes to the wands so you can pop them off after the party and turn them into Disney Frozen bedroom decor! Attach them to the wall or hang them with clear fishing line (high enough not to be a hazard, of course!).
While I made these for a Disney Frozen birthday party, if you need decorations for a winter themed banquet or a snowflake party, these would make great decorations for that as well!
How to Make Easy Frozen Party Centerpieces
Supplies
- Wood number
- Wood snowflake shapes (these are available at Michael's year round)
- Wood dowels
- Elmer's Carpenter's Wood Glue
- Martha Stewart craft paint
- Pond (blue)
- Pure Platinum (metallic silver)
- Wedding Cake (white)
- Feldspar (teal glitter)
- Paint brushes
- Adhesive gems
- Glittery snowflake stickers
- Glass vase
- Clear and blue marbles
- Fiskars 8 Inch Ultimate Craft Snip
or other heavy duty craft scissors/snips
Directions
Step 1: Make wands
Make wands by gluing the dowels to the base of the snowflakes and number using the wood glue.
Step 2: Paint
Paint the wands as desired. I painted the number 5 with light blue paint (pond+wedding cake) and then topped it with teal glitter paint (feldspar). I used three different snowflake shapes and painted one white (wedding cake), one blue (pond) and one silver (pure platinum). The handles were all painted white (wedding cake).
Step 3: Decorate
To fancy them up, I added adhesive gems and snowflake stickers to both the snowflakes as well as the five.
Step 4: Bases
To make the bases, fill a glass vase a little less than halfway full of marbles. I used a mix of clear and blue marbles from Dollar Tree in my bases.
Step 5: Assemble
To assemble centerpieces, plunge wands into marbles to hold them standing upright. Use snips to adjust length of wands as needed to stagger them to make them stand at different heights for added interest.
Place one centerpiece in the center of each round table or make a line of them to go down the center of a rectangular table.
As an extra bonus, you can send the snowflake wands home with party guests as a favor!
Like this? Don't forget to pin it for later!
About the Author:
Carissa Bonham is a lifelong crafter and mom of two creative boys. The owner and lead writer at Creative Green Living, she won the Craftys Award for the "Best Craft Blogger" category in 2016.
Her creative pursuits don't stop at crafts - she is also the author of the hardcover cookbook, Beautiful Smoothie Bowls (Skyhorse, 2017) and several ebooks. Her projects have been featured in magazines like Kids Crafts 1-2-3, Capper's Farmer and Urban Farm Magazine. Follow her on Pinterest, Instagram, Twitter or join the Creative Green Living community group.
Her creative pursuits don't stop at crafts - she is also the author of the hardcover cookbook, Beautiful Smoothie Bowls (Skyhorse, 2017) and several ebooks. Her projects have been featured in magazines like Kids Crafts 1-2-3, Capper's Farmer and Urban Farm Magazine. Follow her on Pinterest, Instagram, Twitter or join the Creative Green Living community group.
Do you like this post? Subscribe to our weekly newsletter!
When you subscribe you can download our FREE Recycled Crafts E-book!


No comments
Post a Comment
I love comments! I welcome your comments and questions about this article here!