
This post is brought to you by HomeRight.

I let you guys know last month that I'm working on re-doing my dining room. My main goal has been to make my dining room a more enjoyable, usable space. I'm doing this by:
- Decluttering and increasing storage (see this post about how I turned an old dresser into a functional sideboard to provide pretty storage)
- Making the space feel lighter and brighter with:
- Fresh paint
- Lighter furniture
- Bright decorative accents
Here is a picture of my dining room before I got started:

Here is what it looks like now with fresh paint and my new sideboard for storage:

The paint changes it SO much! It feels like a completely different room and I'm not even done.
In tackling a big painting project like this I had two hugely important requirements:
- I had to do it fast. My husband hates when I want to do big DIY projects. Hates it. To help make it less painful, I needed to be able to do it while he was gone at work. In fact, I didn't even tell him ahead of time I was going to be painting the dining room.
- It had to be non-toxic. Traditional paint contains high levels of VOCs (VOC=volatile organic compounds). VOCs are toxins that are released into the air inside your home both while you are painting and for up to five years after the paint is dry. Luckily, there are now lots of options available for VOC free paints. These paints will be clearly labeled as being VOC free and usually cost a little more than high quality hardware store paint. Am I willing to spend a little extra money to help protect the health of my family? Absolutely!
To help make my project go quickly, I partnered with HomeRight to try some of their painting tools.
The QuickPainter Edge Painter & The PaintStick EZ Twist


I loved both of these - especially the PaintStick EZ Twist. Using both these tools together made it possible for me to pull off a huge DIY project by myself in a lot less time than if I'd used traditional tools like tape, paint brushes and standard rollers.
To avoid VOCs, I used paint from a company called ECOS. Their paint is not only VOC free but non-toxic, too. This made it possible for me to do this whole project while six months pregnant without worrying about poisoning myself or my baby with toxic paint fumes. It also will protect my family's health for years to come because it will not continue to off-gas VOCs like traditional paint. It's just as beautiful as traditional paint.
Supplies for Fast Painting
- HomeRight QuickPainter Edge Painter
- HomeRight QuickPainter Corner Pad
- HomeRight EZ Twist PaintStick
- Extra Roller Cover
- Canvas Drop Cloth
- VOC free wall primer (I used this one from ECOS)
- VOC free paint (I used this eggshell finish paint from ECOS)
- Sponge
- Damp rags for cleaning up spills
- Ladder or step stool as needed to reach top of walls
- 5 gallon bucket for cleaning up paint tools
Did you notice that my supply list does NOT include traditional painting supplies like paint trays or edge tape? That's because I didn't need them!
Directions
Step 1: Prep
To get started, remove anything you have hanging on the walls, lightswitch plates, and electric plates. Move your furniture out of the room if possible or at least as far from the walls as you can get it.
Fill in any nail holes you will not be re-using after your paint job with spackling paste.
To prepare your surface for painting, use a damp sponge to wipe down your walls to remove grease, fingerprints, etc.

You will also need to cover your floor with a drop cloth. I did not do this so it will not appear in the photos but I absolutely should have done it. The PaintStick will paint your walls MUCH quicker than using a traditional roller and tray set up. It does, however, have quite a bit of micro-splattering that happens as you use it. This isn't a problem if you're using a drop cloth. It IS a problem if you need to clean up your floors afterward by hand.
Step 2: Cut In
Once your walls are prepped, you're ready to cut in. This means painting the edges of the room as well as around areas like window sills and outlets.
If your room is white to start with, you can just apply the paint straight to your walls. If you are painting over a colored wall or are apply a very saturated color, you will need to prime first. I needed to use primer because I was covering a dark red wall with light teal paint. Depending on the color you are painting over as well as the new color you are applying, you may need to use a tinted primer. The helpful people at ECOS or your local hardware store can help you determine which color primer is right for you.
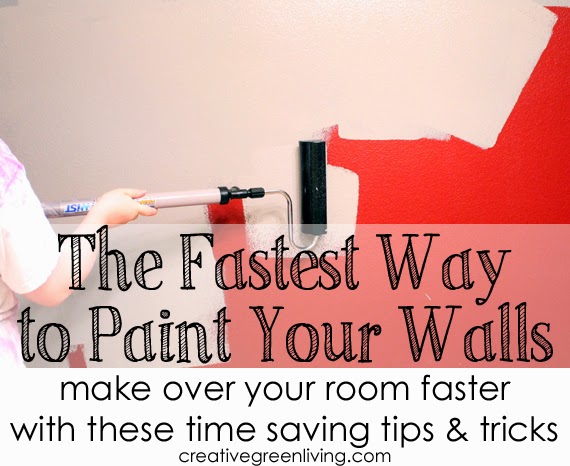
To cut in with my primer, I used the QuickPainter Edge Painter . It holds paint or primer in a reservoir in the handle - so no need to keep dipping a paint brush. It also provides a nice line when you use steady pressure so I didn't have to use tape.
To use the QuickPainter, first remove the head by twisting:

Immerse the tip of the QuickPainter into your paint or primer. Hold down the trigger and draw the yellow plunger on the end away from the handle. Release the trigger first. Then release the plunger.

Remove the handle from the paint, wipe off the tip and twist the painting pad back into place.

Press the trigger a few times to get the paint flowing through the pad. Practice drawing some lines in the middle of your wall so you can get a feel for how it works and what hand position is most comfortable for you.
Note: You should not hold the trigger the whole time you are painting. Once paint is flowing, just pump it as needed to get more paint flowing into the head.
Once you feel comfortable, use the QuickPainter to trim the edges around your windows, where the wall meets the ceiling, along the baseboards and around any electric outlets.

My wall has a corner where two paint colors meet. Instead of taping the corner and painting it twice, I just used the QuickPainter to gently follow the previous color change line down the wall. Look at how sharp that line is!

Once all the non-internal corner edges have been cut in, swap out the paint pad on the QuickPainter for the QuickPainter Corner Pad . This makes painting inside corners on walls just as easy as all the straight lines you just cut in.

Once the walls are cut in, take the time to follow the intructions that came with the QuickPainter to clean it up.
Step 3: Paint
Once you are cut in on all edges, you are ready for your roller!
Follow the instructions that came with the PaintStick EZ Twist to attach the special lid to the top of your paint can and draw the paint into the handle.

Once your handle is locked and loaded, you're ready to paint. Use up and down motions just as you would with a traditional roller to fill in the paint on the wall. Twist the handle every so often to distribute more paint to the roller. The long handle is great and I didn't need to use the ladder to paint my 10 foot ceilings.


You won't believe much faster using the PaintStick EZ twist made everything. It easily took maybe a quarter of the time a traditional roller and try combo would have taken. And I saved my aching pregnant back by not having to keep bending over to use a tray since the paint was loaded right in the handle.
Remember that part about the drop cloth? This is why you need it:

Yikes! All that speed comes with a pay off - and for the PaintStick that means it's a little messy. I still spent less time painting when you add on the floor clean up time as I would have if I'd used a traditional roller. Be warned: a drop cloth or tarp is definitely worth the money to save clean up time.
Step 4: Repeat
Give the primer about an hour to dry before repeating steps 2-3 with the colored paint.
The ECOS paint had great coverage so I only needed to do one well-applied coat of paint on top of the primer. Lower quality paints provide less coverage so take that into account when paint shopping. You can get cheap paint but you'll need twice as much of it as you would if you used a higher quality paint like ECOS.
To save time and hassle, I used two different paint roller heads for the primer and the paint. If you're not in a hurry, though, you can definitely rinse out the roller heads and re-use them. Just be sure they are dry before using them a second time.
Step 5: Put it back together
Give the paint at least an hour (although the longer the better) to dry before re-assembling your room.

I love how it turned out!
Here's the Before and After shot again:

About the paint I used: I used non-toxic and VOC free wall primer and eggshell paint from ECOS. While ECOS has their own line of colors, they can also match any major brand of color paint. I picked up some paint swatches at my local hardware store and had them color match to Olympic brand "Safe Harbor." It is an impressively exact match. The paint had no odor at all and the results were superb.
About the HomeRight products I used: I wouldn't hesitate in the slightest to recommend these products to a friend. I was very impressed with how quickly and easily I was able to paint the room - even though I was 6 months pregnant and working by myself. You can buy HomeRight paint tools at many hardware stores but the best prices I've seen for them have been on Amazon. Here again is a list of the products I used: QuickPainter Edge Painter, QuickPainter Corner Pad, EZ Twist PaintStick, Extra Roller Cover . Don't forget to buy a drop cloth, too!
Need help painting a ceiling? I've got a post for that, too!

Do you like this post? Consider subscribing to our weekly newsletter!

Product review disclosure: This post was sponsored by HomeRight. I was provided with free paint tools and compensated for my time spent creating this tutorial to show you how to use them. ECOS paint generously provided me with the paint and primer I used. All thoughts and opinions shared in this post are my own. I only ever endorse products from companies that I genuinely love and think you, my readers, would enjoy. Please see my full review policy for more information.
Thanks for such a great review on the PaintStick EZ-Twist and Quick Painter! The color looks great!
ReplyDeleteLaura Clark
HomeRight
Pretty nifty! I'll have to look for those!
ReplyDeleteI LOVE my paint sticks! It really is the best way to paint :)
ReplyDeleteI've got quite a bit of painting in my near future(and in my past)! Thanks for all the tips. I'm sure they will help get things done much more quickly. :-)
ReplyDeleteKC
Wow ~ what an amazing transformation and that paint stick looks awesome! Adding to my shopping list for painting my boy's room ~ now I just need to decide on a color!
ReplyDeleteWhat an incredible before and after Carissa! The room was pretty before and now it is stunning! Love the color, and really love how easy the painting was with your HomeRight products! Definitely pinning for the next time we paint! Thx!
ReplyDeleteAmazing! I have the PaintStick, and love it like crazy, but now I REALLY need to get my hands on a Quick Painter, too! My husband hates painting, and since he's tall and we have high ceilings he always gets stuck with the cutting in. He would be thrilled beyond belief if I got him one! Thanks so much for sharing! :)
ReplyDeleteWow I love this! Where can I buy a ex paint stick?
ReplyDeleteI am getting ready to paint my living room (almost the same color as your dining room). Can you tell me how you painted the walls all the way up to the ceiling wihtout getting paint on the ceiling. My ceilings are going to remain white...at least I had planned on that. OR did you paint the ceiling, also?
ReplyDeleteI used the quick painter edge painter to cut in along the edge where the ceiling meets the edge.
DeleteIs there a trick to the paint stick? My husband and I tried for 20 minutes to get it to work and couldn't get it to pull paint up into the handle. We had to dig a small roller out of the garage to get our living room done. The edger worked great though. We have an entire house to paint, including ceilings, so I would love any tips you can give.
ReplyDeleteYikes! That sound so frustrating. Were you pulling the plunger but the paint wasn't coming? Or was the plunger stuck?
DeleteI did this so long ago I don't remember specifics but I do remember that I had to read the instructions because there is a locking mechanism you have to flip to get the plunger part to work.
If you've read through the instructions carefully and are still having a hard time, contact HomeRight's customer service. They are super helpful.
I'm going to paint my room soon, and I'm feeling super confident I can do this myself after reading your post! Thank you! <3
ReplyDeleteI'm so glad! You can totally do this!
Delete